When I decided to start this blog, I had a few key goals in mind: it needed to be fast, secure, and incredibly simple to update. I wanted to avoid the complexity of traditional content management systems (CMS) with their databases, admin panels, and constant security updates. This led me to build a custom, automated static site generation system, and in this post, I'll walk you through exactly how it works.
The Core Philosophy: A Database-Free Approach
At its heart, this website is a static site. This means there's no complex backend or database running in the background every time a visitor arrives. Instead, the entire site consists of pre-built HTML, CSS, and image files. This approach offers three huge advantages:
- Blazing Speed: Serving simple HTML files is significantly faster than querying a database to build a page on the fly.
- Enhanced Security: With no database to attack, a major vector for security vulnerabilities is completely eliminated.
- Simplicity: The entire content of the blog is just a collection of files and folders, which makes it easy to manage, back up, and even version control with Git.
The Magic: The Automation Engine
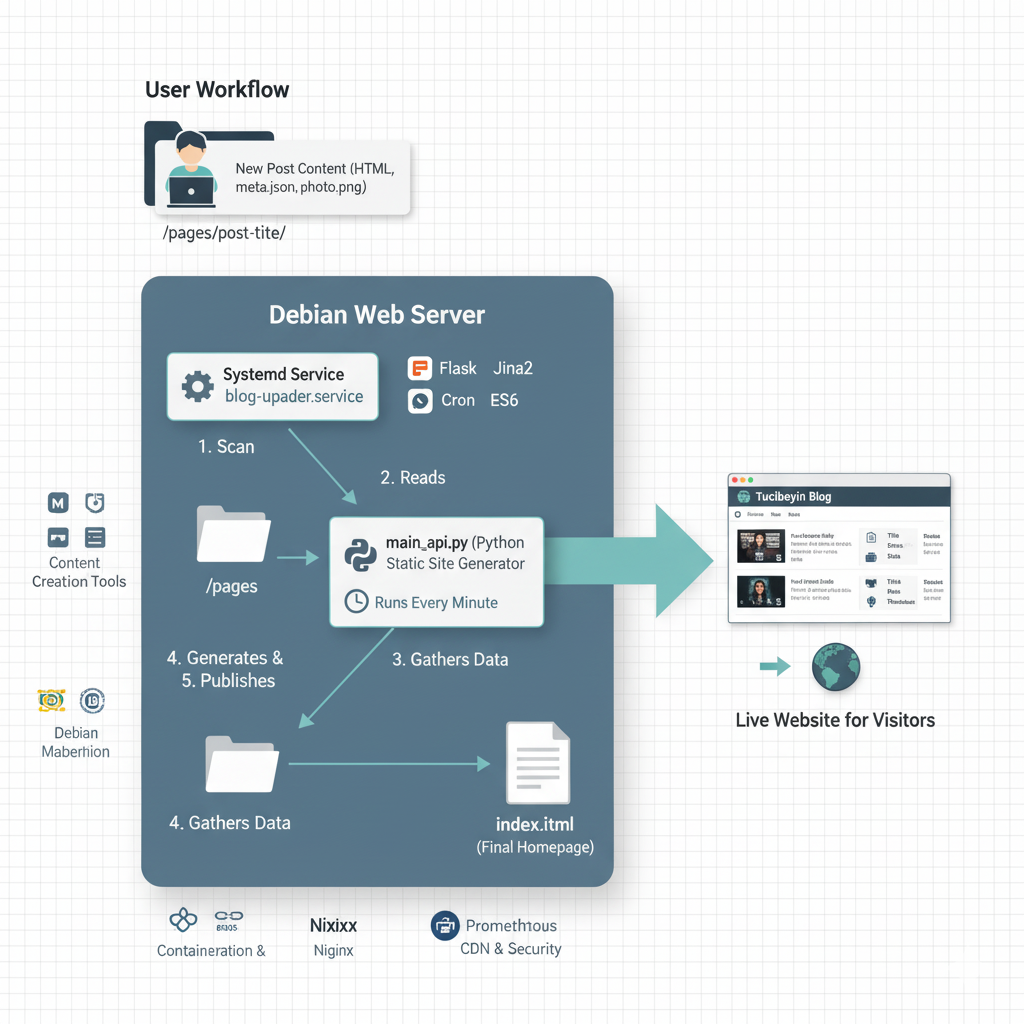
So, if the site is static, how is the homepage automatically updated with new posts? This is where a simple but powerful Python script, main_api.py, comes into play. This script is the brain of the operation and acts as a custom static site generator.
Here’s what it does:
- It Scans for Content: Every minute, the script wakes up and scans the
/pagesdirectory to see if any new folders (blog posts) have been added. - It Reads Metadata: For each post folder it finds, it looks for a
meta.jsonfile. This file contains the post's title, a short description for the card on the homepage, and the publication date. - It Finds the Cover Image: The script also looks for an image file named
photo(e.g.,photo.jpg,photo.png) inside the folder to use as the thumbnail on the homepage card. - It Builds the Homepage: After gathering information from all the post folders, the script reads a master template file (
index.template.html). It then generates an HTML "card" for each post and injects all these cards into the template. - It Publishes the Final Page: Finally, the script writes the completed content into the final
index.htmlfile, which is what you see when you visit the homepage.
The System's Architecture at a Glance
To better visualize how all these components interact, I’ve put together a simple solution architecture diagram. This chart illustrates the entire workflow, from a new post being created in a folder to the live homepage getting automatically updated for visitors.
The Unsung Hero: Systemd
A script is only useful if it's running. To ensure our Python engine is always on duty, I've configured it to run as a systemd service on the Debian server. systemd is a system and service manager for Linux. By creating a simple service file (blog-updater.service), I've instructed the operating system to:
- Start the
main_api.pyscript automatically when the server boots up. - Continuously monitor the script and automatically restart it if it ever stops for any reason.
This provides a robust, self-healing mechanism that keeps the blog's automation running 24/7 without any manual intervention.
The Simple Workflow for a New Post
Thanks to this setup, my workflow for publishing a new article is beautifully simple:
- Create a new folder inside the
/pagesdirectory (e.g.,/pages/my-new-post). - Inside that folder, create the article's content in an HTML file (e.g.,
my-new-post.html). - Add a
meta.jsonfile with the title and description. - Add a
photo.pngfor the cover image.
That's it! Within a minute, the system automatically picks up the new content and updates the homepage. It's a powerful and elegant solution that perfectly balances simplicity and automation.